
Halloumi Recipe
This is no where near a traditional Halloumi. I fear that I may be putting the good name of Halloumi to shame by calling it such. What this is, is a really yummy Halloumi type cheese. Stored in the freezer this cheese is one of the most convenient meals or snacks you can keep on hand to feed to your family. I always serve it pan fried, and toss it into the pan directly from the freezer. My children absolutely love Fried Halloumi. Some of our favourite ways to eat it, is served between 2 pieces of garlic toast as a sandwich, cut up into French fry like pieces, and served with homemade ranch dip, or just plain old pan fried and served alongside a home grown meal.
Ingredients
- 6 gallons good quality fresh raw milk
- 1.5 tsp liquid calf rennet
- 18 % salt brine see notes for preparing an 18% salt brine
Instructions
- Warm Milk to 90F. Turn off heat.
- Dilute rennet in 1/4 cup cool water. Add to your milk using an up and down stirring motion. Cover your pot and leave to sit for 30min- 1hour.
- After 30 min come back to check for a clean break (see my previous blog post about the general steps of cheesemaking).
- Once you have achieved a clean break, cut your curds into a grid of 1 inch cubes. Make this step take 15 minutes. To do this, first cut vertical lines across your curd mass, let sit 5 min. Next cut horizontal lines across your curd mass, let sit 5 min. Finally, cut underneath your curd mass as best you can, let your curds firm up for 5 min.
- Stir your curds continuously for approximately 45 min. As you stir, slowly heat your curds to 105F. Be sure to heat slowly and take the entire 45 min to reach this heat.
- Let your curds settle to the bottom of your pot. Scoop or dump off the whey from your pot (be sure to reserve this whey, you will need it later). There are two ways you can complete this next step depending on your equipment. The basic principal of this next step is, you want to allow your curds to drain and knit together in a nice warm environment.
- Option 1; Transfer your curds to a fine mesh sieve that can be suspended above your cheese pot (see picture). Add a few inches of whey into the bottom of your cheese pot, and turn your burner to low, suspend your cheese above the pot, and put the lid on your pot.Let your curds drain and knit together like this for 30 min. After 30 min come back and flip your curd mass. After 30 more minutes, come back and cut your curd mass into 4 pieces, place these pieces cut side down and leave for another 30 min. Finally come back one more time and flip these 4 pieces over, leave for another 30 min. This entire step will take 2 hours. During this time, you may turn your burner off and on. You do not want to create steam from the whey under the pot, but you do want to keep your curds warm.Option 2: If you do not have a strainer like the one pictured, transfer your curds to a large cheese mold. Put this cheese mold on a draining rack in your empty cheese pot. Fill your sink with warm water, and put your cheese pot in your sink. Put the lid on your pot and leave for 2 hours. Come back to flip your cheese in the mold a few times and refill the sink with warm water if it cools.
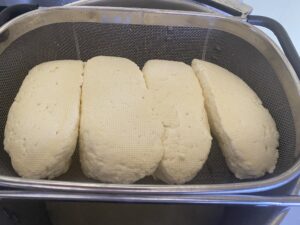
- Bring your reserved whey to 190F. Remove cheese from strainer or mold and cut halloumi pieces into 1 inch thick steaks.
- Place the cheese steaks into the hot whey. Allow to sit in the whey for 10-15 min. Remove from the hot whey and let cool on a drying rack.
- Once your cheeses are cool, put them in your 18% brine for 2-3 hours. Do a taste test at the 2 hour mark, and keep in mind that the saltiness will increase as it sits.
- Remove your cheeses from the brine. Cook and Enjoy at this point, or lay flat on a cookie sheet and freeze before transferring to a freezer bag.
- To Cook your Halloumi, you may do so from fresh or frozen.
- Heat a few tbsp of hot oil or butter in a pan. Pan fry for a few minutes on each side. It will take a few extra minutes if cooking from frozen, but not too much extra.
Notes
If you have been making cheese, chances are you already have an 18% brine prepared.
18% brines, are used in many different cheesemaking recipes, and last a long time when stored in a cool environment (cellar, fridge). The reason I use an 18% brine for this recipe, is I almost always have one kicking around. To prepare an 18% brine mix 1 part salt to 5 parts water.
18% brines, are used in many different cheesemaking recipes, and last a long time when stored in a cool environment (cellar, fridge). The reason I use an 18% brine for this recipe, is I almost always have one kicking around. To prepare an 18% brine mix 1 part salt to 5 parts water.